
1. Create and draw your building
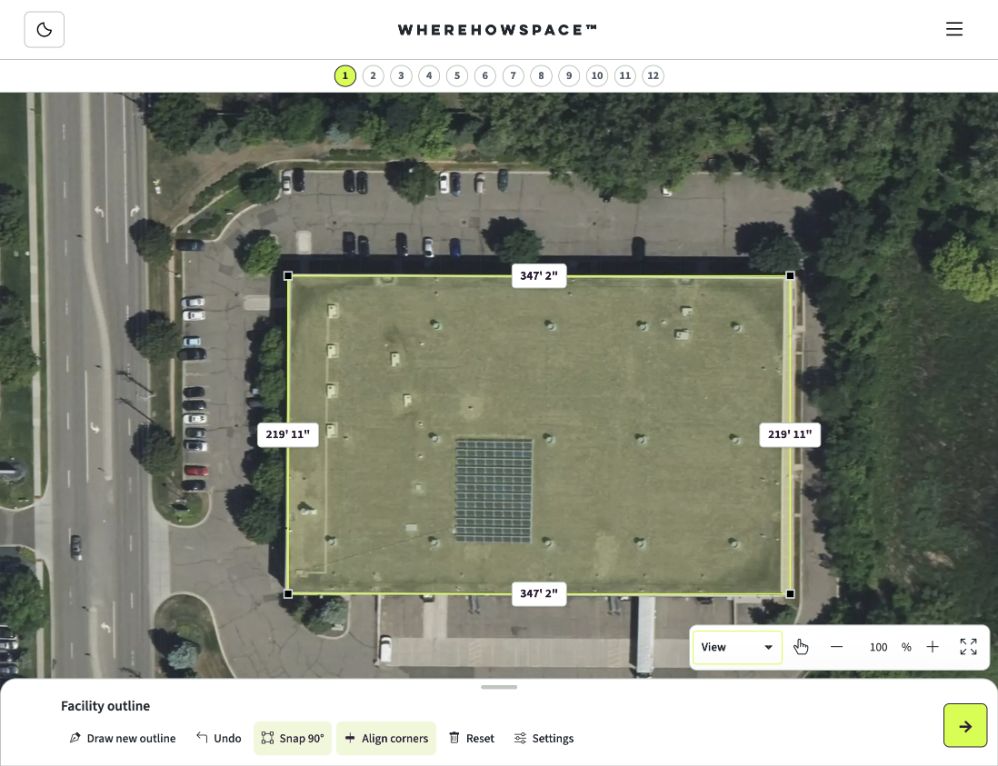
Click Start a warehouse layout to open the building editor. Begin with Draw new outline and create the footprint of your facility. You can draw directly on the canvas, add an image or PDF to trace, or add a satellite map and find the building by address. Close the shape and check its dimensions against your measurements.
Enter the clear height and add columns, local height constraints, and areas reserved for offices, docks, or other activities. These features determine where storage can go. A first-time user can create this model from scratch; no saved building or previous scenario is needed.
The satellite drawing above shows the exterior outline only. For the storage and inventory steps below, we use the saved University Industrial Park example: 31,724 sq ft of gross building area, with 18,520 sq ft designated for warehouse and storage use, including aisles. Its remaining footprint includes shipping, receiving, offices, and other designated areas. Those interior reservations belong to the saved example, not the Boone Avenue building.
2. Set storage and operating rules
Once the building is defined, set up the storage and operating requirements for your first calculation. If you are following the inventory-based workflow, add your product and demand data as well. This worked example uses the WHS sample dataset with 375 SKUs; the screenshots show the settings retained with its completed run.
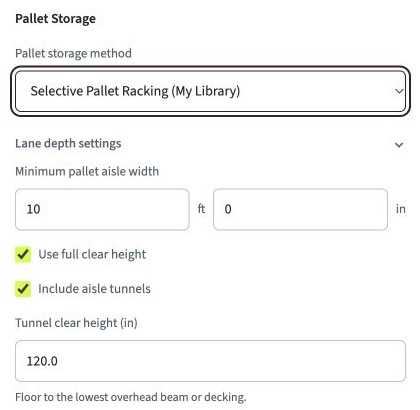
Choose the pallet storage method and minimum pallet aisle width. This example uses selective pallet racking, 10 ft pallet aisles, and the building’s full clear height. Those are the saved scenario’s assumptions, not a recommended aisle width for every forklift.
Use settings that match your equipment and loads. Pallet dimensions, loaded pallet height, rack openings, and access requirements influence the arrangement and storage levels. WHS also exposes options such as aisle tunnels and crossover spacing; enabling an option does not guarantee that a feasible placement will exist.
Review the inventory model as well as the product data. This saved run uses a turns-per-year model set to 4.5. Its 5,136-pallet requirement is the demand to test against the layout, not the capacity of the building. When your inputs are ready, Run Scenario calculates the new layout.
3. Explore the layout in 2D and 3D
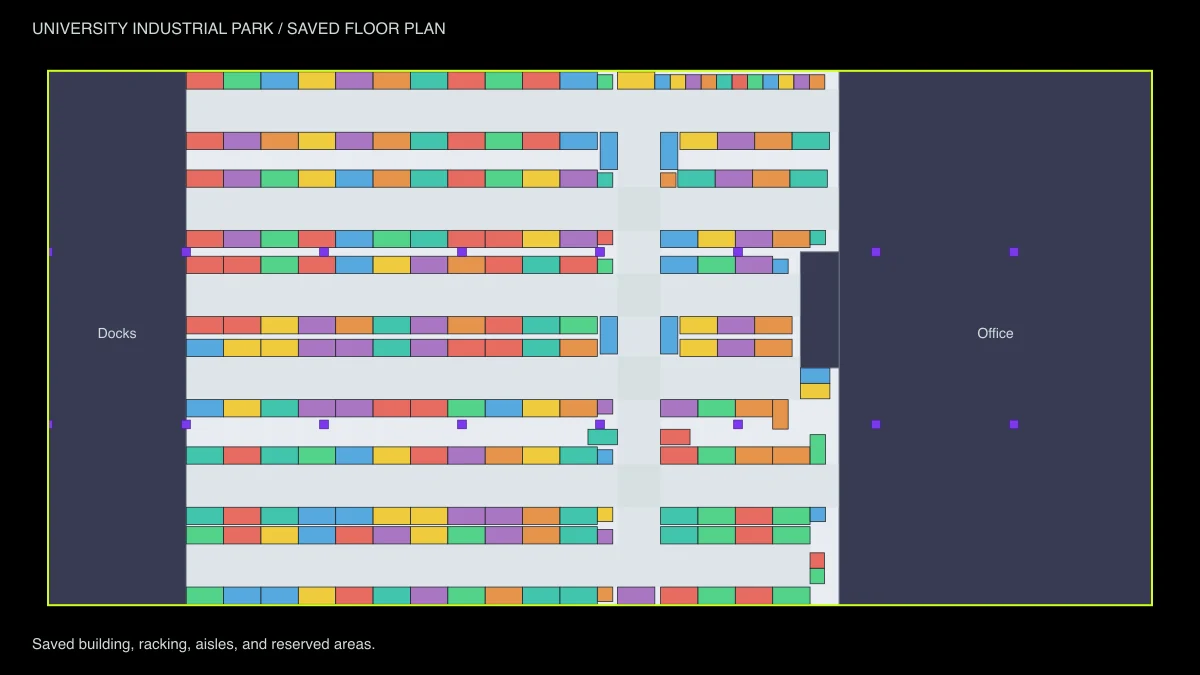
Explore the saved University Industrial Park plan below. Switch to 2D to see how rack rows and aisles fit around the building’s fixed features, or switch to 3D to rotate the model and inspect its vertical arrangement. In the 2D plan, the dock area is on the left, the large office reservation is on the right, and storage occupies the space between them.
Trace the routes between storage and the docks. Check how columns interrupt rows and whether the reserved spaces match your intended operation. When working in the full WHS app, View aisles and Show Dimensions provide more detail. Compare the layout with its inventory shortfall before deciding whether the building is a viable candidate.
- Gross building area
- 31,724 sq ft
- Pallets placed / required
- 1,599 / 5,136
- Pallets unplaced
- 3,537
Saved inventory example: 375 SKUs, selective racking, 10 ft aisles, and 24 ft main clear height. The shortfall suggests exploring a larger building.
The saved 3D layout loads as you reach this section.
4. Check what actually fits
Switch to View 3D to inspect the vertical arrangement and the inventory placed in the racks. Read the SKU & Pallet Detail alongside the model: a visually full warehouse is not evidence that all of your inventory fits.
| Measure | This example |
|---|---|
| Required pallets | 5,136 |
| Pallets placed | 1,599 |
| Pallets unplaced | 3,537 |
| Installed / occupied storage locations | 1,462 / 1,462 |
The result is a shortfall: 3,537 required pallets remain unplaced. All 1,462 installed storage locations are occupied, but those locations and pallet counts measure different things. WHS counts rack slots and floor-stack footprints as locations; do not substitute that count for pallets placed.
With 3,537 of 5,136 required pallets unplaced, this modeled scenario suggests the building is unlikely to accommodate the inventory requirement. A larger building should be explored. Alternative layouts can help test the limits of this facility, but the size of the shortfall gives little reason to assume that rack or aisle adjustments alone will make it fit.
5. Explore a larger building and compare
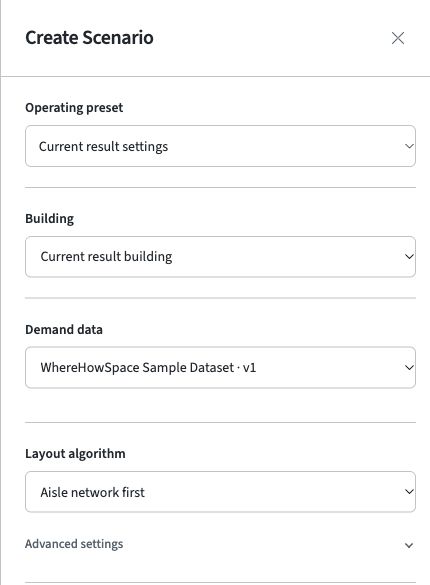
For this example, the next step is to explore a larger building using the same Demand data and operating requirements. Open Create Scenario and select a candidate building. Model its actual footprint, clear heights, columns, and reserved areas, then run the scenario and compare pallets placed and inventory left unplaced. More gross floor area alone does not establish that the inventory fits.
You can also retain Current result building to test the limits of the original facility. Compare selective racking with double-deep racking, or an aisle width supported by different handling equipment. These runs can reveal potential improvements, but should not replace the search for a larger building given the original shortfall.
A single input can have effects across the layout. A different aisle width may change the number of rows, their orientation, or how they connect around columns. Deeper storage may add physical positions while reducing access to separate product groups. Compare pallets placed, unplaced inventory, storage locations, and the actual plan together before deciding whether a candidate building meets the requirement.
The screenshots here show the original saved run only. A revised scenario needs its own calculation; the original totals should not be treated as a forecast for a different configuration.
Use Export SVG Layout and Download Master Table to review the evidence with your team. In this example, the original result supports exploring a larger building; bring that shortfall and the results from candidate buildings into the facility decision.
Before you start
Can I start without an inventory file?
Yes. The public starting flow supports building drawing and storage-field planning without a product dataset. The example on this page uses the inventory-based workflow, which adds SKU-level demand and pallets-placed results.
Do I need an account?
You can open the public building-layout flow without signing in. Private libraries, saved demand data, and the inventory-based workflow shown here use a signed-in account.
Is the result an engineered installation drawing?
No. WHS supports layout and capacity feasibility. Validate rack design, equipment clearances, fire protection, and operating safety before implementation.
Test your warehouse layout
Start with your building and storage requirements, inspect the generated layout, and compare alternatives against the same operating needs. In this worked example, the substantial inventory shortfall points toward exploring a larger building. Use WHS to test those candidates against the full requirement before committing to a facility.
Open WhereHowSpace Calculator